Friday 30 December 2011

30th Foot

Work on the Hussars has been put on hold while I wait for the bases. I ordered them online and am looking forward to getting down to basing. In the meantime I've been messing about - between mince pies - with a bit of battlefield debris to add to the bases.


Need to do the pompom but quite pleased with these - my first and possibly last two Frenchmen. If any buffs out there notice any glaring errors (not my field) please let me know!

For Christmas I got this excellent book on Quatre Bras. I have only dipped into it so far but it seems very well written and even includes a few British accounts which I was hitherto unaware of.


Just flicking through, one of the most interesting details which I came across was reference to the confusion the 30th Foot caused by their wearing of white trews - being mistaken for the some Guards battalions (who were also wearing white instead of grey).
 Glad I read this before painting hundreds of them wrong! Also means I'll be able to identify the 30th at a glance and distinguish them from the 44th (who had the same facings). According to my master plan I shall be doing both regiments using mostly Victrix so it's nice to avoid having two identical units, keeps me from getting so bored when painting!

Decided to do a quick company of the 30th (much reduced after Quatre Bras) to see what they would look like.


I want to add a light grey wash to the trousers and then muddy them up quite a bit but for the moment I'm quite pleased.


Here is Serjeant Thomas Kettlin, killed at Waterloo. He's a hybrid of Victrix and Perry parts.


 The next posting will hopefully be the completed and based 10th Hussar troop.  Happy New Year!

Monday 19 December 2011

British Hussars Floyd's Troop - Week 3

This week has been spent doing dozens of little bits and pieces - red trim on saddle cloth, ink wash for saddle cloth, sword (unfinished here), reins etc, bit more work on horses, shako plate, brass end to carbine, yellow trim on pellisse (and so on!)


 I also spent quite a while on the brass chin straps - some I just painted gold and others I tried a non-metal technique of brown and yellow. Can't decide which I prefer, perhaps a combination of both would be best.


 I also did the stirrups but these need touching up, and the metal barrell of the carbine, and the oilskin holders.


I'd never done horses before and while some of them have turned out reasonably well others need a lot more work. I find it hard to put in the same level of care and effort on them, my eagerness to get on with the rider (which I enjoy) causing a pretty slapdash approach.


Also need to finish the sash and cords worn around the waist. This is tricky as there is so much equipment in the way of the brush now, on the other hand because it is almost entirely obscured only a hint of red and yellow in the vague area will suffice. Would have been a real pity if I'd spent ages painting the sashes to perfection before assembling, only for them to be 95% hidden from view. I might still try the other method for the next batch which I hope to be a troop of the 18th Hussars.


"Are you sure about charging this square?"


The final steps will be the finishing touches - highlighting and tidying, and then basing. Not sure how I will base them, perhaps on quite large blocks of 8 or 12. I don't wargame but maybe the hobby will be around when I pop my clogs - hopefully in the distant future - and I'm sure nobody will want to buy a base of 50 horses! It's something I think about. I'd be interested to hear advice from the wargaming fraternity r.e. basing and numbers.

I'm going to paint up a few French and Belgian casuaulty figs and have fun sticking them on the bases (I believe it is a myth that horses won't trample on a man on the ground!) as well as various bits of battlefield detritus - drums, hats, muskets etc. If my memory serves - yes, I suppose I could look it up and check - the 10th only really got going towards the end of the day, so the ground would certainly be plenty of such items.


Sunday 11 December 2011

10th Hussars Flloyd's Troop - Week 2


Step 14. Lots of different details this week- shako plate, intricate little cuff design (aaargh!), grey saddle blanket, red part of plume, saddle roll. This last should contain the regimental number (in this case X LD) but this will just look terrible if I attempt it and so I will wait for someone to one day bring out decals!


Step 15. Basic coat for the horses in a variety of browns...


...and grey for Trumpeter Oliver James


Step 16. Finish plume and tidy up shako.


 I used a gloss red for the shako top to give that laquered card look, as the previous matt looked too dull

 Nearly all the shakos needed tidying up where the white of the rim had crept up onto the top.


Step 19: black trim of the pelisse followed by a dark grey drybrushing to pick out the detail of the fur.
It's easy to miss details on new figures and I'd advise spending a bit more time than I did before diving in. Here you can see how I completely missed a segment of the gold frogging (bottom right, between the two cuffs) - so will have to go back and do it again. I also messed up in missing that the officers' pelisses are actually different - a bit more ornate - and have stuck them on other ranks, so will have to sort them out later. Hey ho!
A week of Christmas drinking ahead and doubt I'll get much painting done but will post any progress soon!


Sunday 4 December 2011

10th Hussars - Floyd's Troop


Exciting times - got hit by a car AND 5 boxes of British Napoleonic Hussars arrived.  Decided to use the two days off work getting started on them - I don't get paid if I miss work in my job so I wanted to put this "recovery" time to good use.


Step 1 - Get knocked off your bike by a blind woman in a Toyota, this will give you four straight days including the weekend to get started on the 10th Hussars.


Step 2 - cut off all the pieces and sort them into parts you will need/not need - the fullest box here contains all the latter, the marvellous array of pre-1815 headgear and raised arms etc. Note most important item of equipment, bottom right.


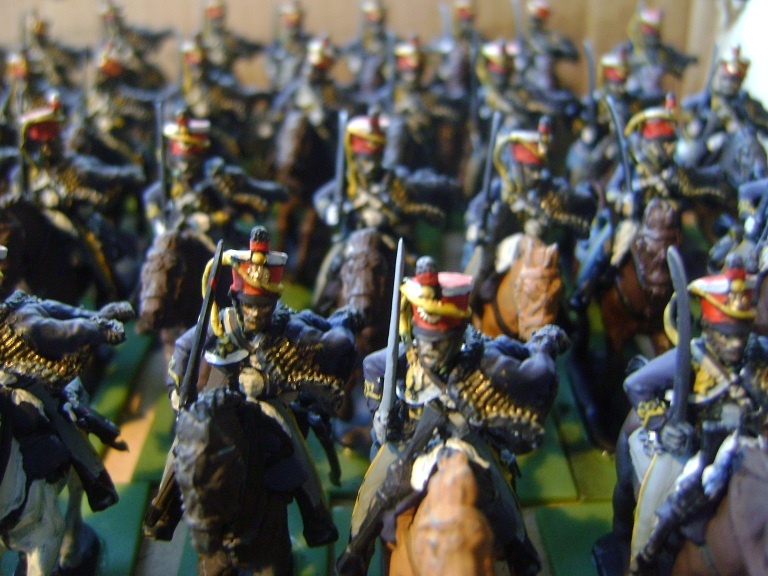
Step 3 - assemble horses - there are 9 possible combinations. so I try to mix them for maximum variety. Here are 50 horses, I shall be making a Troop of the 10th Hussars who at Waterloo numbered no more than 50 in the field (don't want to make MORE than 1:1 ratio!).


Step 4 - attach riders to horses - this is a matter of personal preference - some people prefer to paint the riders separately, some even prefer to do this on the sprue. I'm open to experiment and may well try some of these other approaches for the next batch I do. A number of pros and cons come to mind for each method.


Step 4 - the castings are beautifully clean - nothing like the amount of flash you get on metals - the only little thing that needs fixing is a slight indentation in the top of the shakos. Fixed with a blob of glue.


Step 5 - I added a few little bits and bobs to some of the figures - bags,boxes, fiddles etc.


Step 6 - undercoated the horses with a black matt enamal from a DIY store.


Step 6 - undercoated the riders with a very matt black from Humbrol


Step 7 - Faces done. It's all downhill from here in terms of my painting. At this point, faces done and the rest all matt black, I always think my figures look great and I dwell on how nice it would be to have a Brunswick army. They never look so good again, each ensuing step slowly makes them look worse!


Step 8 - Breeches. Grey and then the yellow stripe done later


Step 9 - braid on pelisse - was dreading this as I'd never tried braid before. First attempts to follow lines of braid with yellow paint looked poor. In the end I just blocked in the area with yellow, then washed with a dark blue watercolour, then picked out raised areas with a light yellow and then a little gold. It won't win any prizes but I like it and I hope it will look ok en masse.


 Step 10. The only thing I'm not a fan of on these Perry sculpts is that the medallion-type ends to the cords of the shakos are on the right chest of each torse. These are supposed to "connect" with the cords from the shako. Most of the time you can bend the cord to be near the tip on the chest but it's a pretty messy arrangement. I must confess I hadn't worked this out when I glued all the heads on and consequently some of the cords are too far away. In these cases I cut off the plastic cord and made my own with cotton thread.


Step 11 - I did the same for this officer's reins. I'd cut off his collar and reglued it so that he could twist right round in the saddle (to make sure his men were following him!). This left a big gap between left hand and reins so I added some new ones with thread.


Step 12 - Dangling part of shako cords painted yellow.


Step 13 - Red shako done. Plenty to tidy up later. Back to work tomorrow but will return to this asap. Thanks for looking!


Posted by Lord Hill at 12:26

Thursday 1 December 2011

40th Foot - Number 3 Company

Very happy with these - at least I was until I took pics. What appear to be marvellous painted figs to my naked eye look like they've been painted by a lunatic holding a wallpaper brush with his feet when photographed up close. I now believe that all the other painters out there, the pro ones, use a combination of microscopes and black magic. Anyway, here are a new company of the 40th Foot, one of the most battle-hardened, experienced units (from any side) at Waterloo.


I've been cutting down on the mixing of Victrix/Perrys. For some regiments I shall continue blending the two together, others will be exclusively one or the other. Most of Pack's Brigade are by Victrix, for example. The 4th and 40th from Lambert's brigade from now on will be predominantly Perry.
The front rank of this company, Perry kneeling metals, arrived this morning and I shall be beginning them today.


 I got hit by a car yesterday and was very lucky to get away with just a broken nose and a headache (the car came off worse, I knew all those bacon sandwiches would see me in good stead at some point).  Anyway, I'm not going to return to work until Monday so this gives me two whole days of painting! Every cloud...